
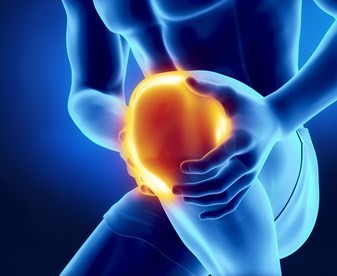
What are the menisci?
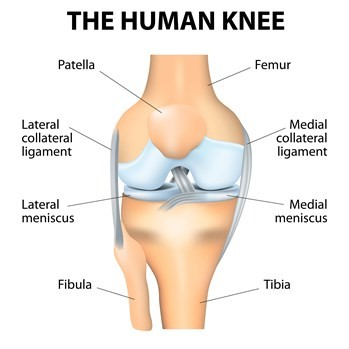
The menisci are C-shaped tissues inside the knee joint, located between the thigh (femoral) and shin (tibia) cartilage surfaces. Both are found in the joint. There is one on the inside of the knee (medial) and one on the outside (lateral).
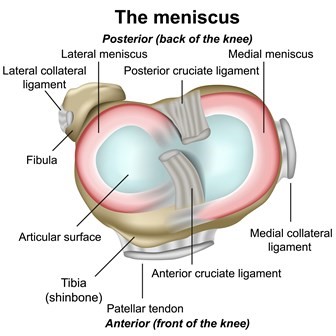
The outer parts have adequate blood supply, but the middle and inner parts have poor blood supply. Because blood supply can affect healing, the location of a tear will affect treatment options.
What does the meniscus do in your knee?
The menisci are tissues that respond to the forces and loads that you put into the knee. They have several important functions:
- shock absorption
- load transmission (spreading weight more evenly into the knee joint)
- increasing knee joint stability
- joint lubrication
What are the types of meniscal injuries?
The menisci are a commonly injured part of the knee joint. There are two types of injury:
- acute meniscal tears (due to a specific injury)
- degenerative meniscal tears (not due to a specific injury)
It is important to know the difference between these two types of injuries, because their management is very different.

Degenerative meniscal tears
Some key features of degenerative meniscal tears are that:
- they happen in middle-aged or older people
- there is no specific injury or incident
- they can gradually come on and get worse
- there is knee pain that can be difficult to pinpoint
What are the causes of degenerative meniscal tears?
There is no one specific cause of degenerative meniscal tears. They are probably an early sign of osteoarthritis (the normal aging process of joints), rather than a completely separate diagnosis.
However, a lot of middle aged and older people have degenerative meniscal tears without knee pain, because changes within the menisci are perfectly normal age-related changes and responses that happen within the knee as we get older.
While there is no one cause, there are a range of contributory factors which may increase the risk of developing degenerative meniscal tears, such as:
- being overweight
- having poor exercise fitness
- weakness in the muscles of the thigh and bottom
- tightness of the lower limb muscles
- overactivity
Magnetic Resonance Imaging (MRI) research studies report a 35% prevalence of degenerative meniscal tears in people over 50 years of age.
Most of these meniscal tears are asymptomatic (meaning that the person has no pain or symptoms) and prevalence is similar in those with and without knee pain (20% versus 25%).
Degenerative meniscal tears are closely related to tissue aging and is a process in osteoarthritis in the knee.
How long will it take to get better?
There are no quick fixes for a degenerative meniscal tear due to the reduced blood flow into the area making healing a slow and gradual process.
With exercises, and by following lifestyle changes, you may see some improvements at 3 to 6 months, although this can take longer depending on:
- your overall health
- long term compliance to the advice
Do I need a scan?
MRI (Magnetic Resonance Imaging) scans give a very detailed picture of the knee, and may form part of the eventual investigation of your knee pain. However, there is poor correlation between MRI findings of degenerative meniscal tears and the level of pain experienced by the patient.
The best way to understand your symptoms is a detail assessment by your:
- physiotherapist
- GP
- consultant
Degenerative meniscus tears commonly exist in people without knee pain, so it is important that treatment deals with your contributory factors and not just the picture generated from the MRI scan. It is important to treat the person rather than the picture of the scan, because many images show incidental findings.
An MRI scan will only be needed if:
- surgery is being considered
- you have fully exhausted the physiotherapy management and lifestyle changes you need to make
However, it is important to note that in middle aged and older people, research studies have shown that the outcomes from arthroscopy surgery (key hole surgery) on degenerative meniscal tears were no better than those who opted to self-manage.
An x-ray can help to determine whether there is any significant level of osteoarthritis within the knee. This is important, as if this is the case, surgery in the form of arthroscopy (key hole surgery) is often ineffective in relieving pain in the long term and will likely speed the arthritis process due to loss of the meniscus. This will often lead to the need for arthroplasty (knee joint replacement) in the future of the patient.
See our information on knee replacement surgery for more details.
Will I need surgery?
From the most up to date evidence, surgery is not recommended for degenerative tears in the meniscus because the removal of this shock absorber will expose the bone that can eventually increase the risk of osteoarthritis.
Osteoarthritis is common following an arthroscopy, which can potentially lead to the need for arthroplasty (knee replacement surgery).Therefore, it is suggested that leaving as much of the meniscus as possible will help you knee in the long term.
However, if there is true ‘locking’ of the knee following a traumatic injury there may be an acute meniscal tear. Removal of the tissue (known as a meniscectomy) may be indicated. The goal is to improve the function and range of movement of the knee.
Degenerative meniscal tear exercises
Changes in lifestyle and modifying the known causes, as previously explained, can reduce the symptoms getting worse. The one professional who can help you manage your symptoms is you.
The exercises in the videos below have been provided to help with your knee pain. If there is any doubt about your fitness to do these exercises, please discuss this with your GP.
You may find that these exercises may slightly increase your symptoms initially. However you should find that the exercises themselves will become easier to do and that you begin to move your knee more easily. It can take around 12 weeks for you to notice a great improvement.
If the exercises do cause some discomfort, then taking prescribed medication from your GP or pharmacist may help you to continue to exercise.
If these exercises cause a large increase in your pain, or after 12 weeks there are no noticeable changes in your day to day symptoms, please contact your GP or NHS Inform for more advice.
The guide below will help ensure you are working at the right level.
Pain during exercise
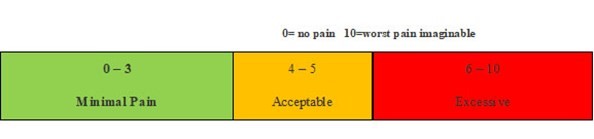
Within the scale, aim to stay in the green or amber boxes. If you are in the red area then you can modify the exercises by:
- reducing the amount of movement during an exercise
- reducing the number of repetitions
- reducing the weights
- reducing your speed
- increasing rest time between sets
Pain after exercise
Your pain or other symptoms should return to your pre-exercise baseline within 30 minutes of exercising. On the morning after your exercises, you should not feel an increase in pain or stiffness that lasts longer than 60 minutes.
Disclaimer
Please note: These exercises should not be used without prior consultation with a medical professional as the use of the wrong exercise may cause additional health related issues and discomfort. NHS Ayrshire & Arran and MSK NHS Ayrshire & Arran are not liable or responsible for any harm, losses or damages whatsoever resulting from the use or misuse of the information contained in or implied by the provided information in each video. These are provided for information only.
If you have any concerns about your ability to perform exercise then please discuss your concerns with your doctor or healthcare provider prior to participating in any advice that is on the MSK NHS Ayrshire & Arran website.
Please choose the most relevant exercise section for you – stretching or strengthening.
Stretching exercises
1. Standing calf stretch
Once your pain becomes more controlled and you can put more weight into the ankle it is recommended to progress your stretching into a standing position.
Part 1: Place your hands on a wall for support and take a step back with the affected foot. It is important that the heel of the affected foot remains on the ground throughout this stretch. Keep the toes of both feet pointing towards the wall. Now begin to bend the knee of your front leg whilst moving your chest towards the wall. You should feel a stretch in the back of your lower leg, hold for 30 seconds. Repeat 3 times, 4 times per day.
Part 2: The second part of this exercise is aimed at stretching the soleus muscle. Adopt the same starting position as you did for the previous exercise. Slide the affected foot towards the front foot as demonstrated. This time when bending the front knee also bend the knee of the back leg until you feel a stretch deeper in the calf muscle. Hold this for 30 seconds Repeat three times, four times per day.
2. Quadriceps stretch
Rise up into a standing position. Hold onto a support such as the back of a chair or kitchen work-top surface. Bend your painful knee and take hold of the ankle. Do not lock the knee of the leg you are standing on. Slowly pull your heel towards your buttock. Feel the stretch down the front of your thigh. Hold for 30 seconds. Repeat three times, four times per day.
3. Hamstring stretch
Stand with the heel of your painful leg on a footstool or bottom step. Pull the toes backwards and keep the knee as straight as possible. Slowly bend your upper body forwards from your hips keeping your back straight. You should feel the stretching at the back of your knee and thigh. Hold for 30 seconds. Repeat three times, four times per day.
4. Prone lying (over edge of bed)
Lie face down on your bed with your feet over the edge. Slide down so that the top of the knee is resting on the bed and your lower legs are hanging over the edge. Hold for 30 seconds. Repeat 3 times. 4 times per day
To increase the stretch, you can use the other leg to add more weight and increase the stretch.
Strengthening exercises
Squats
Level 1: Chair squats
Slide your bottom to sit at the edge of the chair. Rest both hands across your body. Stand up and then slowly sit down on the chair. As soon as you bottom touches the chair start to rise back into a standing position. Once in the standing position ensure that your knees are full straight and you tighten your bottom muscles. However, do not full lock your knees. This exercise can be made easier or more difficult by changing the height of the chair. Repeat 15 repetitions. Repeat three times.
Level 2: Deep squats
Stand tall with your feet slightly wider apart than your hips. The toes should be pointing forward or turned a few degrees outwards. Slowly then lower downwards so you are sitting back and bring your arms upwards. Push back through the feels and keep the chest up. Push your knees outwards to keep your hips, knees and toes aligned. Try and lower as far as you can without rounding your lower back. Repeat 15 repetitions. Repeat 3 times.
Level 3: Deep squats on wobble cushion/pillow
Stand tall with your feet slightly wider apart than your hips. Place a wobble cushion or pillow under your feet. Slowly then lower downwards so you are sitting back and bring your arms upwards. Push back through the feels and keep the chest up. Push your knees outwards to keep your hips, knees and toes aligned. Try and lower as far as you can without rounding your lower back. Repeat 15 repetitions. Repeat 3 times.
Level 4: Forward lunge
Stand tall with feet hip-width apart. Take one long step forward and squat down so that your rear knee touches the floor and hip is fully straightened. Shin of the front leg and trunk is upright. Stand back up pushing through your heel, bringing your front foot back to the starting position.
Pelvic lifts
Level 1: Pelvic lift with both feet supported on gym ball
To do this exercise – lie on your back with the heels of both legs resting on the ball. If you do not have an exercise you can use a chair. Tilt your pelvis and lift you bottom off from the floor. Hold for 5 seconds and then slowly lower your bottom back down onto the floor. Repeat 15 repetitions. Repeat 3 times.
Level 2: Hamstring curl on gym ball (both feet)
Lie on your back with the heels of both legs resting on the ball. Tilt your pelvis and lift your bottom from the floor. Slowly roll the ball towards you. Your feet will then be flat on the ball. Then slowly roll the ball so both legs fully straighten. Lower your bottom back onto the floor. Repeat 15 repetitions. Repeat 3 times.
Level 3: Single leg hamstring curl on gym ball
Lie on your back with the heels of both legs resting on the ball. Tilt your pelvis and lift your bottom from the floor. Lift the non-painful leg off the ball. Slowly roll the ball towards you until your foot is flat on the ball. Then slowly roll the ball so the painful leg is fully straighten. Lower your bottom back onto the floor. Repeat 15 repetitions. Repeat 3 times.
The Plank
Level 1: The Plank
Lie face down. Support your body weight on your forearms and toes. Tighten your stomach muscles and bottom muscles. Hold for 20 seconds. Repeat 5 times. Repeat 3 times per day.
Level 2: The Plank with hip extension
To do this exercise – lying face down. Support your body weight on your forearms and toes. Tighten your stomach muscles and bottom muscles. Keep both legs as straight as possible. Lift the painful leg. Hold for 3 seconds and then slowly lower back to the starting position. Repeat 15 repetitions. Repeat 3 times.
Side lying plank
Level 1: Side planks
Side lying, feet next to each other. Upper body supported on your forearm with the shoulder directly above the elbow. Lift your pelvis and hold for 20 seconds. Make sure your body should be in a straight line when looking from the front or side. Repeat 3 times per day.
Level 2: Side Plank with hip abduction
To do this exercise – Side lying, feet next to each other. Upper body supported on your forearm with the shoulder directly above the elbow. Lift your pelvis. Lift your painful leg away from other leg. Make sure your body is in a straight line. Repeat 15 repetitions. 3 times per day
Step ups
Level 1: Step ups (normal)
To do this exercise – stand facing the bottom step. Lift your painful leg onto the step. Slowly step onto the step and full straighten the leg. Slowly step backwards with non-painful leg coming off the step and back onto the floor then remove the painful leg from the step. When straightening make sure you tighten the bottom muscles. Repeat 15 repetitions. Repeat 3 times.
Level 2: Step ups and over
Stand facing an exercise step. Lift your painful leg onto the step. Slowly step with the non-painful leg over the step and land on the floor on the other side of the step. Remove stand facing an exercise step. Lift your painful leg onto the step. Slowly step with the non-painful leg over the step and land on the floor on the other side of the step the painful leg from the step to join the leg on the floor. Turn and face the step and repeat. Repeat 15 repetitions. Repeat 3 times.
Level 3: Step up and over and return
Stand facing an exercise step. Lift your painful leg onto the step. Slowly step with the non-painful leg over the step and land on the floor on the other side of the step. As soon as the heel contacts the floor then return the leg back over the step. Then remove painful leg from step. Repeat 15 repetitions. Repeat 3 times
Level 4: Single leg squat (side on over a step)
To do this exercise – stand on your painful leg, side on the step. Slowly bend your knee as far as able and then slowly straighten your knee as much as possible. Repeat 15 repetitions. Repeat 3 times.
Level 5: Step jumps
Stand facing an exercise step. Slightly bend both knees into a mini squat then jump onto the exercise step and jump off the box. Repeat 15 repetitions. Repeat 3 times. If you do not have an exercise step, you can use the bottom step of a staircase if safe to do so
Level 6: Step hops
Stand facing the exercise step. Stand on painful leg. Lift the non-painful leg from the floor. Slightly bend the knee and hop onto the exercise step. Then hop backwards to the starting position. Repeat 15 repetitions. Repeat 3 times.
Side lunge
Level 1: Side lunge (with cloth for assistance)
To do this exercise – Rise into a standing position with a cloth under your painful leg. Slowly slide the cloth sidewards so that it increases the space between your legs and your knee starts to bend. Go as far as pain allows. Then slowly slide and return to the starting position. Repeat 15 repetitions. 3 times. You may be unable to do this on a carpet and wooden/laminate flooring is preferred for this exercise
Level 2: Side lunge
Rise into a standing position. Lift painful leg out to the side and land bending your knee and lowering your bottom towards the floor. Then lift the painful leg back to the starting position. Repeat 15 repetitions. Repeat 3 times
Level 3: Side lunge with resistance band
Rise into a standing position. Tie a resistance band round both legs. Lift painful leg out to the side and land bending your knee and lowering your bottom towards the floor. Then lift the painful leg back to the starting position. Repeat 15 repetitions. Repeat 3 times
Level 4: Skating
Rise into a standing position. Slight jump onto the painful leg and bending knee. The non-painful leg must be kept straight and this will swing behind you as you bend your truck and touch your hand off the floor. Quickly spring to the other side adopting the same position then alternate between the two positions. Repeat 15 repetitions for both sides. Repeat 3 times.
Level 4: Side hop
Rise to a standing position. Side hop onto the painful leg and then quickly side hop to the non-painful leg. Repeat 15 repetitions. Repeat 3 times.
Single leg press with a resistance band
Sit or lie with your painful knee bent as far as possible. Hold a resistance band in both hands and place under arch of foot. Slowly push your leg straight until full straight. Hold for 5 seconds and then slowly bend your knee back to the starting position. Repeat 15 repetitions. Repeat 3 times.
Knee extension with resistance band
Sit in a chair with a resistance band wrapped round your ankle and tied to a leg of a chair. Slowly straighten your leg as much as able. Pull the toes backwards. Hold for 5 seconds and then slowly bend your knee back to the starting position. Repeat 15 repetitions. Repeat 3 times.