
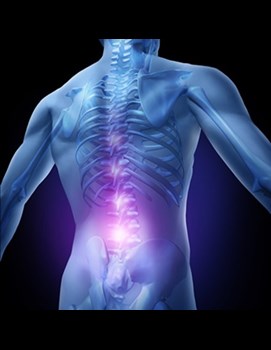
What is Lumbar Spinal Stenosis?
Lumbar Spinal Stenosis is a common condition that occurs when the area of the back that contains the nerves or spinal cord becomes more narrowed. This narrowing is a perfectly normal part of the ageing process of the spine and may not cause any symptoms. However, sometimes this narrowing effects the blood flow to the nerves decreasing their ability to transfer signals and that can cause pain, numbness, weakness or tingling down your leg or legs.
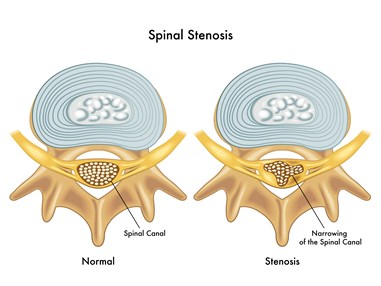
Diagram 1: Picture of Narrowing of the Spinal Canal
What Causes Lumbar Spinal Stenosis?
Lumbar Spinal stenosis can be caused in 2 ways:
- Acquired Spinal Stenosis – This is a narrowing of the spinal canal due to disc protrusions or bony changes often due to age that take place over time in the low back.
- Congenital Stenosis – Some people are born with a small spinal canal.
The risk of developing lumbar spinal stenosis increases if:
- You were born with a narrow spinal canal
- You are female
- You are 50 years old or older
- You have had a previous low back injury or surgery of the lumbar spine
- Family history of spinal stenosis
- Elevated Body Mass Index/Overweight (Please click HERE to calculate your Body Mass Index)
Some medical conditions can cause lumbar spinal stenosis. These include:
- Osteoarthritis of the low back
- Ankylosing Spondylitis
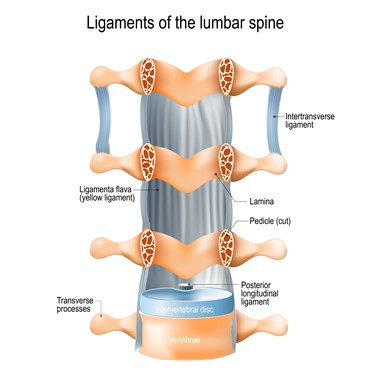
- Thickening of the Ligamentum Flavum (Diagram Below)
- Paget’s Disease
What are the Symptoms of Lumbar Spinal Stenosis?
- Pain, weakness or numbness in the legs, calves (back of the lower legs) or buttocks
- Cramping in the calves with walking, requiring frequent short rests often by leaning forward or sitting down, before you are able to walk the same distance again
- Pain radiating into one or both thighs or legs similar to the lay term ‘sciatica’
- Pain may start after a period of being in an upright position such as standing
- Pain may improve with bending forward (such as pushing a trolley), sitting or lying down
Should I be concerned?
Lumbar Spinal Stenosis does not normally cause any serious problems. However, there are some symptoms that anyone with back or leg pain should look out for that would indicate you need further assessment. If these changes happen suddenly you should seek urgent assessment at your GP practice. These changes are –
- Feeling like you are slapping your foot/feet when you walk
- Significant change in your walking or balance
- Severe night pain or night sweats
- Rapid, unexplained weight loss
Click HERE for a printable version of this section.
Lumbar Spinal Stenosis Exercises
The exercises in the videos below have been provided to help with your back and leg pain. If there is any doubt about your fitness to do these exercises then please discuss this with your GP.
You may find that these exercises may slightly increase your symptoms initially. However you should find that the exercises themselves will become easier to do. These exercises can take up around 12 weeks for you to notice a great improvement.
If the exercises do cause some discomfort then taking prescribed medication from your GP or pharmacist may help you to continue to exercise.
If these exercises cause a large increase in your pain or after 12 weeks there are no noticeable changes in your day to day symptoms then please contact your GP or NHS Inform for more advice.
The guide below will help ensure you are working at the right level:
Pain during exercise
Aim to stay in the green or amber boxes. If you are in the red area then you can modify the exercises by trying reducing the amount of movement during an exercise, the number of repetition, reducing the weights, reducing your speed or increasing rest time between sets.
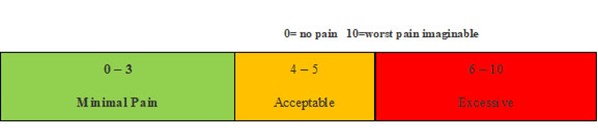
Pain After Exercise
Your pain or other symptoms should return to your pre exercise baseline within 30 minutes of exercising. You should not feel an increase in pain or stiffness that last longer than 60minutes the next morning after your exercises.
Choosing the most relevant exercise section for you
- Section 1 - Mobility Exercises
- Section 2 - Lower Limb Strengthening Exercise.
- Section 3 – Stretching
- Section 4 – Functional Exercises
Section 1: Mobility Exercises
Before undertaking the suggested exercises please review our disclaimer. Please click HERE
Level 1: Pelvic Tilts
To do this exercise – Lie on your back on a flat, stable surface. Bend your knees so that your feet are flat on the surface. Imagine that you are gently lifting up the base of your spine towards the ceiling and slowly tilt your pelvis backwards. As you do this you should draw your back down to the floor. Aim to hold this for 20 seconds and repeat 5 times. Aim to do this 3-4 times per day.
Level 2: Knee to Chest
To do this exercise – Lie on your back on a stable surface. Slowly draw one knee at a time up towards your chest, pulling with your arms from behind your knees to gain as much bend as comfortable. Aim to hold for 10 seconds. Repeat with each leg 10 times. Aim to do this 3-4 times per day.
Level 3a -“Angry Cat/Sad Cat”
To do this exercise – Place hands and knees onto stable surface with your back in a flat position. Slowly lift your spine upwards to round your spine, like your are tucking your bottom inwards. Hold for 5 seconds and then stick your bottom outwards to return to the start position. Repeat times 5 times. Aim to do this 3-4 times per day.
Level 3b – Childs Pose
To do this exercise – Place hands and knees onto stable surface into a table position. Reach your arms out in front of you and then slowly lower your bottom towards your heels until you feel a stretch in your back. Hold for 10 seconds. Repeat 5 times. Aim to do this 3-4 times per day.
Level 4 – Forward Bend in Sitting
To do this exercise – Sitting on a stable chair with your feet planted on the floor. Slowly bend forwards towards the floor as far as you feel able. Hold for 5 seconds and then slowly return to starting position. Repeat 10 times. Aim to do this 3-4 times per day.
Section 2: Lower Limb Strengthening Exercises
Improving the strength of the buttock muscles are important during your recovery.
Exercise 1: Hip Abduction
To do this exercise – Lie on your side with your painful leg uppermost. Pull your toes back and keep your legs straight. Lift your leg upwards towards the roof. Hold for 10 seconds and then slowly lower the leg back to the starting position. Repeat 15 times. Aim to do 3 sets of 15 repetitions.
Exercise 2: Bridging
To do this exercise – Lie on your back with your knees bent up so that your feet are flat on the ground. Tilt pelvis backwards and then slowly lift your buttock muscles off the surface and high as you are able. Hold for 5 seconds and gently lower back to the starting position. Repeat 15 times. Do not over arch your back during this exercise. Aim to do 3 sets of 15 repetitions.
Section 3: Stretching
Exercise 1 – Hamstring Stretch
To do this exercise – Lie on your back, then slowly pull one knee into your chest. Holding onto the back of your knee, slowly straighten your leg. Hold for 20 seconds. Aim to repeat 3 times per day.
Section 4: Functional Exercises
Moving the back as it is designed to do is important during your recovery. They may initially be painful but the more practice they may reduce your pain.
Exercise 1 – Standing Forward Bend
Do not do this exercise if you have issues with your balance.
To do this exercise – lift your painful leg and place on a chair. Slow bend your back forwards reaching with both hands towards the chair (like you are trying to tie your shoe-laces). Hold this position for 5 seconds. Repeat 10 times. Aim to do this 3-4 times per day.
Exercise 2 – Rotational Hip Stretch
Do not do this exercise if you have issues with your balance
To do this exercise – lift your painful leg and place on a chair. Place your hand on your knee and turn your back to twist and look over your leg. Hold this position for 10 seconds. Repeat 10 times.
Aim to do this 3-4 times per day
Exercise 3 – Mobility Exercises
This exercise needs a weighted household object such as a bottle of water or a handbag. For the purpose of this video we are using a medicine ball.
PART 1: To do this exercise – hold the weighted object in both hands with your arms out in front of you. Keep back straight as you can with weight through both limbs. Rotate from side to side as pain allows. To this 15 repetitions on both sides.
Aim to do 3-4 times per day
PART 2: To do the second part of the exercises – hold the weighted object in both hands. Raise this above your head as far as you feel comfortable. Then slowly lower and slightly bend your knees to place the weighted object between your legs. Then slowly return to the starting position. Do this 15 times. Aim to do 3-4 times per day.
Neurodynamics
Exercise 1 – Sciatic Nerve Gliding
To do this exercise – sit on a chair. Round your back and lower head so your weight is down via your tailbone. Slowly start to straighten your affected leg out until you reach the point of tension in the nerve. Do not push any further beyond this point.
Hold you knee in this position. Look up towards the roof with your head as you pull your toes backwards. Then return to the starting position. Perform the movement fluidly. Do for 30 seconds, repeat several times per day.
Exercise 2 – Sciatic Nerve Gliding with Ball
To do this exercise – sit on chair with a ball under. Round your back and lower head so your weight is down via your tailbone. Slowly roll the ball away from you, straightening your affected leg and pull the ankle backwards towards you. At the same time lift your head up. Do not push into pain or tension. Then pull ball backwards as you lower your head. Do for 30 seconds, repeat several times per day.
Exercise 3 – Femoral Nerve Gliding