
What is patellofemoral pain syndrome?
Patellofemoral pain syndrome is a term used to describe pain or discomfort arising at the front of the knee between the kneecap (patella) and the thigh bone (femur). These areas form a joint in the leg known as the patellofemoral joint.
It is estimated that as many as 1 in 3 adults will experience pain in this area at some point in their life with symptoms varying between from person to person.
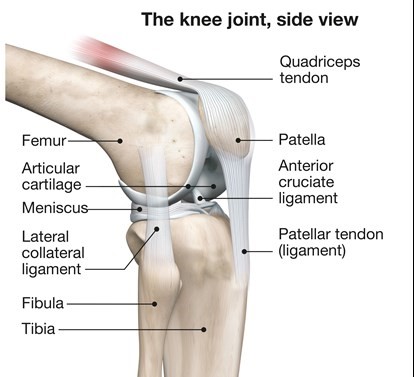
The patellofemoral joint is where your kneecap (patella) and the thigh bone (femur) meet at the front of your knee. The underside of your kneecap sits in a groove in the thigh bone that allows the patella to glide up and down. However, the kneecap can also make small side-to-side, tilting and rotation movements.
When you use (contract) your thigh muscle (quadriceps) they pull on the quadriceps tendon that attaches to your kneecap. This allows your lower leg to straighten. This contraction with addition of other muscles allows the kneecap to glide in the groove during motions such as walking and climbing stairs.
What are the symptoms of patellofemoral pain syndrome?
Pain is the main symptom and it can be felt anywhere around the kneecap and in some rarer occasions at the back of the knee.
There are a variety of other symptoms that people with patellofemoral pain syndrome experience, including:
- Clicking, clunking or grinding sensation
- Pain bending or straightening your knee
- Mild swelling
- A feeling like your knee might give way
- Pain when squatting
- Pain going up or downstairs
- Pain going up or down hills
- Pain on running
- Pain on jumping
What causes patellofemoral pain?
Patellofemoral pain syndrome most often occurs without an injury (non-traumatic) to the knee but can be the result of an injury such as a fall on to the knee.
If you have not injured your knee, it may be difficult to find one specific cause for your symptoms because it can be down to a combination of factors.
In many causes it is often associated with:
- The start of a new activity
- An increase in the intensity and/or frequency of an existing activity
- Or, following a period of reduced activity that leads to weakening of the muscles
There are many contributing factors, that can vary from person to person, but it is rare for them to be all present. There is usually a combination of factors that cause symptoms such as:
- Weakness in the buttock and thigh muscles
- Tightness at the back of your thigh muscles (hamstrings)
- Being overweight
- Poor footwear selection such as high heels or flat arched shoes
- Occupations that require kneeling
The first three factors are by far the most common.
Do I need a scan or x-ray?
The use of x-rays or scans are not routinely used to help diagnose patellofemoral pain syndrome because the history and examination of the knee giving a good indication of the condition.
On occasions an x-ray may be used to assess if your patellofemoral joint has osteoarthritis but even with an x-ray this will not change your management plan on how to help your symptoms. Similar can be said about the use of MRIs.
What will happen to the pain?
Fortunately most people will gain somewhere between 60% to 80% improvement with physiotherapy and the introduction of some lifestyle changes.
In most cases the symptoms will get better without any specific treatment.
There is no link between this type of knee pain and generalised knee joint arthritis later in life.
It is normal to experience a brief increase of symptoms when you first start the exercise programme. This is due to muscles working in an unaccustomed manner. These symptoms usually settle over a few weeks (over 12 weeks in some cases) and are not a sign that things are deteriorating.
In some cases a very mild discomfort and clicking can remain or appear from time to time, you will be able to return to your normal activities.
What can I do for my knee pain?
Changes in lifestyle and modifying the known causes, as previously explained, can reduce the symptoms getting worse. The one professional who can help you manage your symptoms is you!
Research has shown that undertaking a structured exercise programme and making lifestyle choices is the best therapy.
Patellofemoral pain syndrome exercises
The exercises in the videos below have been provided to help with your knee pain. If there is any doubt about your fitness to do these exercises then please discuss this with your GP.
You may find that these exercises may slightly increase your symptoms initially. However you should find that the exercises themselves will become easier to do and that you begin to move your knee more easily. It can take around 12 weeks for you to notice a great improvement.
If the exercises do cause some discomfort, then taking prescribed medication from your GP or pharmacist may help you to continue to exercise.
If these exercises cause a large increase in your pain, or after 12 weeks there are no noticeable changes in your day to day symptoms, please contact your GP or NHS Inform for more advice.
The guide below will help ensure you are working at the right level.
Pain during exercise
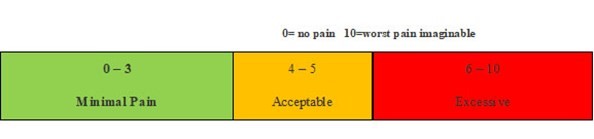
Within the scale, aim to stay in the green or amber boxes. If you are in the red area then you can modify the exercises by:
- reducing the amount of movement during an exercise
- reducing the number of repetitions
- reducing the weights
- reducing your speed
- increasing rest time between sets
Pain after exercise
Your pain or other symptoms should return to your pre-exercise baseline within 30 minutes of exercising. On the morning after your exercises, you should not feel an increase in pain or stiffness that lasts longer than 60 minutes.
Disclaimer
Please note: These exercises should not be used without prior consultation with a medical professional as the use of the wrong exercise may cause additional health related issues and discomfort. NHS Ayrshire & Arran and MSK NHS Ayrshire & Arran are not liable or responsible for any harm, losses or damages whatsoever resulting from the use or misuse of the information contained in or implied by the provided information in each video. These are provided for information only.
If you have any concerns about your ability to perform exercise then please discuss your concerns with your doctor or healthcare provider prior to participating in any advice that is on the MSK NHS Ayrshire & Arran website.
Please choose the most relevant exercise section for you.
Section 1: Stretching
Exercise 1: Quadriceps stretch
The quadriceps stretch aims to improve the flexibility of the muscles at the front of your thigh which attach from the hip to the knee. Hold the stretch for a slow 30 second count and repeat five times.
Exercise 2: Hamstring wall stretch
The hamstring stretch aims to improve the flexibility of the muscles at the back of your thigh which run roughly from your bottom to just below your knee. Hold the stretch for a slow 30 second count and repeat five times.
Exercise 3: Gastrocnuemius/Soleus stretch
This exercise focuses on stretching the muscles of the lower leg commonly known as the ‘calf’ muscles (the gastrocnemius and soleus). Hold each stretch for a slow 30 second count and repeat five times.
Exercise 4: Adductor stretch
The adductor stretch aims to stretch a group of muscles along the inner thigh, commonly called the groin muscles. Hold the stretch for a slow 30 second count and repeat five times.
Section 2: Strengthening
Exercise 1: Wall squats
The wall squat is a strengthening exercise for several muscles in the lower body that need to be strong to assist with your symptoms. This exercise works the gluteus maximus (or bottom muscles), the hamstrings (the muscles of the back of your thigh), the quadriceps (the muscles down the front of your thigh) and the core muscles (the muscles of your abdomen). Start at one set of 15 repetitions daily and slowly increase this to three sets of 15 repetitions as you become stronger and fitter.
Exercise 2: Forward step-up
The forward step-up is a strengthening exercise which targets the quadriceps (the muscles down the front of your thigh), the gluteus maximus (bottom muscles or glutes), the hamstrings (the muscles of the back of your thigh) and the core muscles (the muscles of your abdomen). Start at one set of 15 repetitions daily and slowly increase this to three sets of 15 repetitions as you become stronger and fitter.
Exercise 3: Heel drop
The heel drop exercise is used to improve the strength of the gluteus maximus (bottom muscles or glutes), the quadriceps (the muscles down the front of your thigh), and the hamstrings (the muscles of the back of your thigh) and to improve your lower body control and balance. Start at one set of 15 repetitions daily and slowly increase this to three sets of 15 repetitions as you become stronger and fitter.
Exercise 4: Mini squat
If you do not feel confident with the heel drop exercise (exercise 6) then an alternative exercise that can be done without a step is the mini squat. This focuses on strengthening the gluteus maximus (bottom muscles or glutes), the hamstrings (the muscles of the back of your thigh), the quadriceps (the muscles down the front of your thigh) and the core muscles (the muscles of your abdomen). Start at one set of 15 repetitions daily and slowly increase this to three sets of 15 repetitions as you become stronger and fitter.
Exercise 5: Pelvic Drops
The pelvic drop exercise is used to strengthen the gluteus medius muscle (the muscle at the side of your bottom). Start at one set of 15 repetitions daily and slowly increase this to three sets of 15 repetitions as you become stronger and fitter.
Exercise 6: Bridging
This exercise is a very effective way of strengthening multiple muscle groups of the lower back and legs. Start at one set of 15 repetitions daily and slowly increase this to three sets of 15 repetitions as you become stronger and fitter.
Exercise 7: Sit-to-stand
The sit-to-stand strengthening exercise primarily targets the gluteus maximus (bottom muscles or glutes), the hamstrings (the muscles of the back of your thigh), the quadriceps (the muscles down the front of your thigh) and your back muscles. Start at one set of 15 repetitions daily and slowly increase this to three sets of 15 repetitions as you become stronger and fitter.
Exercise 8: Alternating Lunges
Lunges are lower body strengthening exercises that work several muscle groups at once. The targeted muscles groups include the gluteus maximus (bottom muscles or glutes), the hamstrings (the muscles of the back of your thigh), the quadriceps (the muscles down the front of your thigh) and your back muscles. Start at one set of 15 repetitions daily and slowly increase this to three sets of 15 repetitions as you become stronger and fitter.