
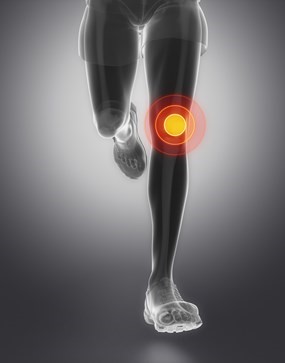
What is patellar tendinopathy?
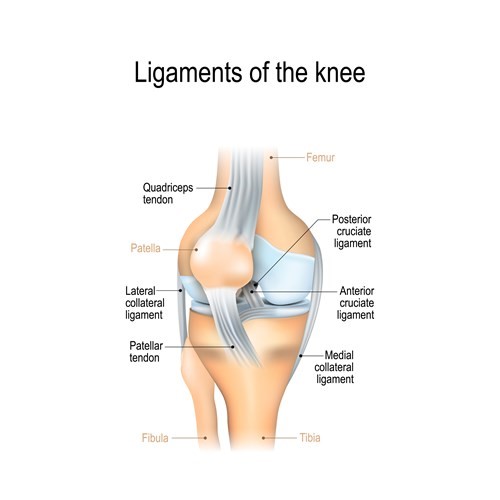
Patellar tendinopathy (also known as jumpers’ knee) is a relatively common soft tissue injury. It affects the tendon at the front of your knee, below your knee cap (patella). This tendon is known as the patellar tendon.
It is also sometimes called patellar tendinitis or tendinosis but these are the same as the modern term ‘tendinopathy’.
What causes patellar tendinopathy?
The cause of patellar tendinopathy is still not fully understood. However, research suggests that it is an overuse injury that occurs when the tendon is unable to adjust to the level of strain that you have placed in this soft tissue. This leads to repeated small tears within the small tendon fibres and as the tendon tries to repair itself the area becomes painful and thickened.
What are the risk factors?
Many factors affect the load being put through the tendon. It is not simply the result of exercising too much.
General risks
- Age: Most commonly from the age of 30 years and onwards
- Gender: More common in men
- Weight: People who are overweight are more likely to develop this condition
- Reduced Strength: Reduced strength in the thigh, calf and buttock muscles
- Flexibility: Tight thigh muscles can increase risk
Certain aspects of exercise and training can increase your risk of developing symptoms. It is common in particular sports that involve jumping and running such as basketball, volleyball, tennis, football and badminton.
Common training errors
- Increasing running distances too soon
- Excessive jumping exercises (known as plyometrics)
- Too much weight training with adequate rest days
- Hill running
- Lack of variation in training
- Sudden increase in training i.e. taking up a new activity that your body is not use to or re-starting training after a rest period such as pre-season exercise
What are the symptoms of patellar tendinopathy?
Pain or tenderness over the patellar tendon
If the symptoms have been developing over a period of time the tendon may look thickened and can mistakenly suggested as swelling. However, if the tendon is gently squeezed pain will be created.
Morning stiffness
Morning stiffness can be noticed around the tendon when you get up first thing in the morning and activities such as going downstairs may be painful. This stiffness usually eases after a few minutes of walking but can last longer in some cases.
Variable pain
Not each individual’s pain is the same. Some people can experience high levels of pain doing the simplest of daily tasks whereas other may be able to exercise with no issues but are then after resting following this activity can cause pain.
How long will it take to get better?
Each person will be different but it can take over six months to improve and some people are left with a lasting pain that needs to be managed on daily basis to prevent sudden spikes in pain from occurring.
Do I need a scan?
Patellar tendinopathy usually needs to further investigation with the patients symptoms, history and findings on examination a clear indicator for the condition.
In rare occasions an ultrasound scan may be used to understand the amount of small tears within the tendon but this would only be conducted following after compliance to all advice, exercises and time of healing to occur.
What can I do for my patellar tendinopathy?
Changes in lifestyle and modifying the known causes, as previously explained, can reduce the symptoms getting worse. The one professional who can help you manage your symptoms is you!
Research has shown that undertaking a structured exercise programme and making lifestyle choices is the best therapy.
Patellar tendinopathy exercises
The exercises in the videos below have been provided to help with your knee pain. If there is any doubt about your fitness to do these exercises then please discuss this with your GP.
You may find that these exercises may slightly increase your symptoms initially. However you should find that the exercises themselves will become easier to do and that you begin to move your knee more easily. These exercises can take up around 12 weeks for you to notice a great improvement.
If the exercises do cause some discomfort then taking prescribed medication from your GP or pharmacist may help you to continue to exercise.
If these exercises cause a large increase in your pain or after 12 weeks there are no noticeable changes in your day to day symptoms then please contact your GP or NHS Inform for more advice.
The guide below will help ensure you are working at the right level.
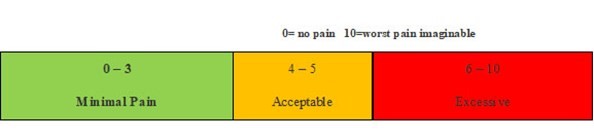
Pain during exercise

Within the scale, aim to stay in the green or amber boxes. If you are in the red area then you can modify the exercises by:
- reducing the amount of movement during an exercise
- reducing the number of repetitions
- reducing the weights
- reducing your speed
- increasing rest time between sets
Pain after exercise
Your pain or other symptoms should return to your pre-exercise baseline within 30 minutes of exercising. On the morning after your exercises, you should not feel an increase in pain or stiffness that lasts longer than 60 minutes.
Disclaimer
Please note: These exercises should not be used without prior consultation with a medical professional as the use of the wrong exercise may cause additional health related issues and discomfort. NHS Ayrshire & Arran and MSK NHS Ayrshire & Arran are not liable or responsible for any harm, losses or damages whatsoever resulting from the use or misuse of the information contained in or implied by the provided information in each video. These are provided for information only.
If you have any concerns about your ability to perform exercise then please discuss your concerns with your doctor or healthcare provider prior to participating in any advice that is on the MSK NHS Ayrshire & Arran website.
Please choose the most relevant exercise section for you.
Section 1: Isometric
Level 1: Quad Set (Seated)
To do this exercise – Sit upright on floor or bed. Extend your injured leg out in front of you. Keep the other knee bent. On your injured leg, lift your heel up and push your knee towards the floor or bed. Hold for 45 seconds, then relax for 2 minutes and repeat this cycle 5 times.
Repeat 3 times per day.
Level 2: Bug Squash
To do this exercise – lie on your back near a wall. Bend your hip to 90 degrees and bend your knee of the injured leg. Position yourself so that your toes are against the wall. Place foot flat on wall, unsure you knee has a 60-90 degree bend. Push your foot against the wall as if you were squashing something underneath your foot. Hold for 45 seconds, relax for 2 minutes and repeat this cycle 5 times.
Repeat 3 times per day.
Level 3: Wall Sits (Double Leg)
To do this exercise – stand with your back against the wall with your feet slightly more than shoulder width apart. Lean back against the wall. Bend you knees to 60-90 degrees. Raise up on your toes.
Make sure your knees are not bent past your toes. Keep back flat against the wall. Hold this position for 45 seconds, relax 2 minutes and repeat this cycle 5 times.
Repeat 3 times per day.
Level 4: Wall Sits (Single Leg)
To do this exercise – stand with your back against the wall, with your feet slightly more than shoulder width apart. Lift your healthy leg off the ground. Lean back against the wall. Bend your injured knee to 60 to 90 degrees and rise up onto your toes.
Make sure your knees are not bent past your toes. Keep back flat against the wall. Hold this position for 45 seconds, relax 2 minutes and repeat this cycle 5 times.
Repeat 3 times per day.
Level 5: Isometric Knee Extension with Resistance Band
To do this exercise – sit with a resistance band wrapped round the ankle of the injured leg. Straight the leg to 30-60 degrees of flexion. Hold this position for 45 seconds, relax 2mins and repeat 5 times. Repeat this 3 times per day
Section 2: Isotonic Strengthening
Exercise 1: Knee Extension with Resistance Band
To do this exercise – tie the resistance band round the leg of a chair and the ankle of the injured leg. Slowly straighten your leg until it is completely straight. Hold for 5 seconds and then slowly return back to the starting position.
Do 3 sets of 15 repetitions.
Exercise 2: Leg Press (Double) with Resistance Band
To do this exercise – lie on floor or bed with the resistance band wrapped under both heels. Hold the other end of the band with both hands. Bend both hips to a 90 degree bend. Press your feet against the band until both legs are straight. Then slowly return to the 90 degree hip bend.
Do 3 sets of 15 repetitions.
Exercise 3: Leg Press (Single) with Resistance Band
To do this exercise – lie on the floor or bed with a resistance band wrapped under the heel of the injured leg. Bend the hip of the injured leg to a 90 degree bend. The other leg should remain straight and resting on the bed. Press your foot against the band until the leg straightens. Then slowly return to the 90 degree hip bend.
Do 3 sets of 15 repetitions.
Exercise 4: Split Squat
To do this exercise – get yourself in a starting position where the injured knee comes forwards and the health leg goes behind. Bend both knees slowly lowering towards the ground and then slowly return to starting position.
Do 3 sets of 15 repetitions and the switch legs and do a further 3 sets of 15 repetition.
Exercise 5: Heel Raises
To do this exercise – rise to a standing position. Stand feet shoulder width apart. Hold the back of a chair or sturdy surface to assist with your balance. Rise both heels from the floor moving the weight onto the balls of each feet. And then slowly return to the starting position.
Do 3 sets of 15 repetitions.
Section 3: Decline Squat Loading
Exercise 1: Decline Squat (Double Leg)
To do this exercise – you will need a decline board, plate weight or sturdy support for this exercise. In this video we are using a weight to raise the heel.
Stand with your heels on a support. Slowly bend your knees and lower into a squat position. Hold your arms out in front of you to help stay in balance. Make sure you keep toes pointing forwards and heels remain on the support.
Exercise 2: Decline Squat (Single Leg) Eccentric Loading
To do this exercise you will need a decline board, plate weight or sturdy support to raise your heels. In this vide we are using a decline board.
To start with stand with both feet on the board with heels flat on the surface. Lift the health leg up to 90 degrees hip flexion. Slowly bend the sore knee for a count of 4 seconds. Once the knee is bent bring the non-painful leg back onto the surface. Then straighten both knees together to return to the starting position.
3 sets of 15 repetitions. To make more challenging you can add hand weights but only do as pain allows.
Section 4 – Energy Storage Exercises
Exercise 1: Double Legged Box Jumps
To do this exercise – have a sturdy box that will not move on the surface you are exercising. Gently bend both knees and then quickly jump onto box with both feet land and then straighten both knees. Slowly step down from box and then repeat.
Repeat 3 sets of 15 repetition.
Exercise 2: Double Legged Vertical Landing
To do this exercise – stand on top of a sturdy both. Gently bend both knees and jump from the box to the floor. Land with soft knees into a slight bend and gain your balance and then finish by straightening both knees. Slowly step back onto the both and then repeat
Repeat 3 sets of 15 repetitions
Exercise 3: Split Jumps
To do this exercise – start in the split squat position. Bend both knees and then quickly straighten both legs as you switch legs mid-air and land into the split squat position.
Repeat 3 sets of 15 repetitions