
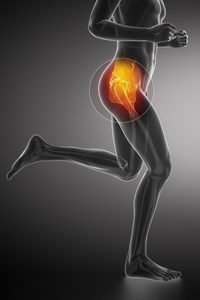
What is Greater Trochanteric Pain Syndrome?
Greater Trochanteric Pain Syndrome (GTPS) is a common hip condition that causes pain over the outside of your thigh/buttock muscle. The cause for these symptoms is usually due to an injury to the soft tissues that lie over the upper aspect of the thigh bone.
GTPS used to be called Trochanteric Bursitis because it was thought that the pain was coming from an inflamed bursa (a small fluid filled sac) that lies over the greater trochanter of the femur (a bony part of your leg bone).
However, recent research suggests that most cases of pain on the outside aspect of your thigh/buttock muscles is due to small injuries to the nearby muscles or tendons. So rather than the term Trochanteric Bursitis, the more general term, Greater Trochanteric Pain Syndrome is now preferred.
What are the symptoms of Greater Trochanteric Pain Syndrome?
These can vary from person to person depending on the initial factors that are causing the condition. People may experience:
- Pain in the outer bottom/thigh/buttock area.
- Worse pain when lying on your side.
- Pain increasing with exercise such as long periods of walking, standing or running.
- Altered walking pattern.
- More noticeable pain when walking briskly.
- Tenderness to touch.
- Pain sitting with your legs crossed.
Causes
Causes of Greater Trochanteric Pain Syndrome include:
- An injury such as a fall on to the side of your hip area.
- Excessive repetitive movements involving your hip area such as increased walking distances, brisk walking pace, running too far a distance.
- Prolonged or excessive pressure to your hip area such as sitting long periods in chairs/seats that are too low, crossing legs, weight-bearing through one leg whilst standing
- Reduced strength and flexibility of the muscles around the hip and buttock.
- Secondary to osteoarthritis of knees and hips.
- Secondary to low back pain.
- Inactive lifestyle, causing weakness in the buttock muscles.
What can I do to get better?
Our information booklet on GTPS will provide a good starting point for your management.
The exercises and advice provided in the booklet have been provided to help with your Greater Trochanteric Pain Syndrome (GTPS). If there is any doubt about your fitness to do these exercises then please discuss with your GP prior to attempting.
Local NHS Ayrshire & Arran physiotherapists have also devised exercise videos to help with strengthening the correct muscles. You can watch these video below.
You may find that these exercises may initially increase your symptoms over the next 12 weeks but be re-assured that persevering should benefit you in the long-term. If the exercises do cause some discomfort then ask your local pharmacist or GP for pain management advice to help you continue the exercises.
If after 12 weeks there are no noticeable changes in your day-to-day symptoms then please contact your GP or consult NHS Inform for more advice.
Weight management
Excess weight increases the pressure of weight bearing joints including your hips. Losing even a small amount of weight can help to reduce the strain on your joints when performing normal daily tasks such as walking and climbing stairs. See the Body Mass Index (BMI) Calculator to check if you need to consider losing weight.
Helpful tips
- Avoid long periods of sitting with legs crossed
- Avoid long periods of sitting with knees wide apart
- Avoid standing on one leg
- Avoid sitting in a low chair
- Try to maintain your activity levels but don’t overdo it
- When climbing stairs or stepping up – step up with the unaffected leg first
- When coming down stair or stepping down – step down with the affected leg first
Greater Trochanteric Pain Syndrome exercises
The exercises in the videos below have been provided to help with your hip pain. If there is any doubt about your fitness to do these exercises then please discuss this with your GP.
You may find that these exercises may slightly increase your symptoms initially. However you should find that the exercises themselves will become easier to do and that you begin to move your knee more easily. It can take around 12 weeks for you to notice a great improvement.
If the exercises do cause some discomfort, then taking prescribed medication from your GP or pharmacist may help you to continue to exercise.
If these exercises cause a large increase in your pain, or after 12 weeks there are no noticeable changes in your day to day symptoms, please contact your GP or NHS Inform for more advice.
The guide below will help ensure you are working at the right level.
Pain during exercise
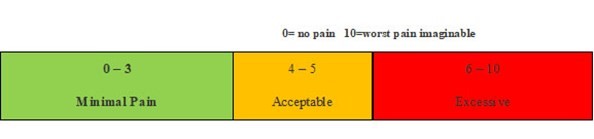
Within the scale, aim to stay in the green or amber boxes. If you are in the red area then you can modify the exercises by:
- reducing the amount of movement during an exercise
- reducing the number of repetitions
- reducing the weights
- reducing your speed
- increasing rest time between sets
Pain after exercise
Your pain or other symptoms should return to your pre-exercise baseline within 30 minutes of exercising. On the morning after your exercises, you should not feel an increase in pain or stiffness that lasts longer than 60 minutes.
Disclaimer
Please note: These exercises should not be used without prior consultation with a medical professional as the use of the wrong exercise may cause additional health related issues and discomfort. NHS Ayrshire & Arran and MSK NHS Ayrshire & Arran are not liable or responsible for any harm, losses or damages whatsoever resulting from the use or misuse of the information contained in or implied by the provided information in each video. These are provided for information only.
If you have any concerns about your ability to perform exercise then please discuss your concerns with your doctor or healthcare provider prior to participating in any advice that is on the MSK NHS Ayrshire & Arran website.
Please choose the most relevant exercise section for you.
Section 1: Isometric exercises
Isometric exercises are a type of strength training that causes a gentle static contraction of the muscle.
This is usually the first phase of tendon rehabilitation where this type of exercise can help to reduce your pain if done correctly. These exercises need to be repeated several times a day and slowly increased to 40second holds to reduce pain, maintain some muscle capacity and tendon load.
In highly irritable tendons, shorter holding time may be indicated and can result in this phase taking longer to complete but should be steadily increased to 40 seconds over time.
This phase can take over 4 weeks to achieve before progressing to the strengthening section
Exercise 1: Isometric hip abduction in lying
To do this exercise lie on your back with your sore hip facing the wall. Gently press your sore leg into the wall and hold for 10 seconds. Then relax. Repeat 5 times in a row and repeat this 4 times per day.
Then for the second week – do the same exercise but now gently hold for 20 seconds, repeat 5 times in a row and do this 4 times per day for a week
Then for the third week – do the same exercise but now gently hold for 30 seconds, repeat 5 times in a row and do this 4 times per day for a week
Then for the fourth week – do the same exercise but now gently hold for 40 seconds, repeat 5 times in a row and do this 4 times per day for a week.
If you find this exercise increases your pain then you are pushing too hard, so you may need to ease off slightly.
Exercise 2: Isometric hip abduction in standing
To do this exercise roughly half a step away from the wall with your sore hip closest to the wall. Gently push your sore leg against the wall and hold for 10 seconds. Then relax. Repeat 5 times in a row and repeat this 4 times per day.
Then for the second week – do the same exercise but now gently hold for 20 seconds, repeat 5 times in a row and do this 4 times per day for a week
Then for the third week – do the same exercise but now gently hold for 30 seconds, repeat 5 times in a row and do this 4 times per day for a week
Then for the fourth week – do the same exercise but now gently hold for 40 seconds, repeat 5 times in a row and do this 4 times per day for a week.
If you find this exercise increases your pain then you are pushing too hard, so you may need to ease off slightly.
Section 2: Improve strength
Once pain has slightly settled you can progress to section 2 and work on strength.
Strength is the ability to produce force and in this context we are aiming to improve the muscle and tendon’s ability to produce force and manage load.
Strength is an essential building block for muscle function, without adequate strength muscle will have poor power and endurance.
Exercise 1: Side lying hip abduction (from a neutral position)
To do this exercise, lie on your pain-free side, with your sore leg uppermost. Place pillows under your sore leg to make it well supported. You need enough pillows to keep your hip, knee and ankle in a straight line.
Slowly lift your sore leg off the pillow to about 5cms off the pillow towards the ceiling. Hold your leg in this position for 10 seconds. Then relax.
To start with aim for 1 set of 15 repetitions and the slowly increase this to 3 sets of 15 repetitions as you become fitter and stronger.
Exercise 2: Bridging
To do this exercise, lie on your back with your knees bent and knees shoulder width apart with your feet flat on the ground. Rest your arms across your chest. Squeeze your bottom muscles together and then slowly lift your bottom off the bed as high as you feel comfortable. Hold for 5 seconds and then slowly return to the starting position.
To start with aim for 1 set of 15 repetitions and the slowly increase this to 3 sets of 15 repetitions as you become fitter and stronger.
During this exercise avoid over arching your back and avoid your knees drifting inwards coming into contact with one another when raising your bottom off the bed.
Exercise 3: Wall squats
To do this exercise stand with your back again the wall with your feet shoulder width apart and roughly a steps pace away from the wall. Slowly bend you knees and lower your bottom towards the floor as your pain allows. Then slowly push yourself back up, straightening your knees, back to the starting position.
To start with aim for 1 set of 15 repetitions and the slowly increase this to 3 sets of 15 repetitions as you become fitter and stronger.
During this exercise avoid your knees drifting inwards when bending your knees.
Exercise 4: Pelvic dips
To do this exercise, stand sideways on a step onto your sore leg. The allow your pain-free leg to hang off the edge of the step. Keep both legs straight. Use your hip muscles to lower your pain-free leg towards the floor and then use the muscles in your sore leg to pull the pain-free leg back to the starting position.
To start with aim for 1 set of 15 repetitions and the slowly increase this to 3 sets of 15 repetitions as you become fitter and stronger.
During this exercise, avoid bending of the knees.