
What is the achilles tendon?
The achilles tendon is the biggest and strongest tendon of the body.
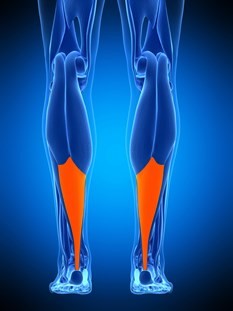
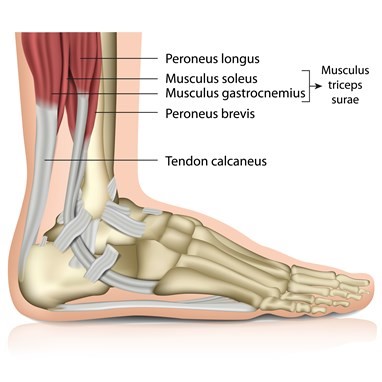
It is found at the back of your lower leg and attaches your two lower leg muscles (gastrocnemius and soleus) to the heel bone (calcaneus). This tendon helps to move the ankle, is important in walking and assists you to go up on your tip toes.
What is an achilles tendinopathy?
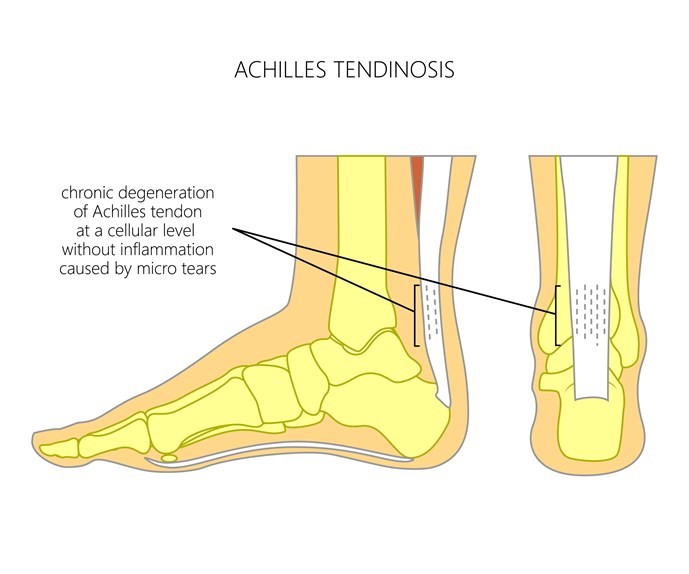
The most common achilles tendon injury type is called mid portion achilles tendinopathy or tendinosis.
The exact cause of the injury is still unknown. However, from the current research it is thought to be caused by repeated stress on the tendon leading to weakening of the small tendon fibres that over time can cause small tears.
As the tendon tries to heal itself over time, the repeated stress on the tendon can cause a thickened nodule or lump just above the heel bone in the tendon. It can be commonly mistaken as a swelling.
How common is an achilles tendinopathy?
An achilles tendinopathy is a relatively common soft tissue injury that can affect both athletes and non-athletes of all ages.
- It accounts for approximately 6-17% of all running injuries
- It accounts 52% of injuries in elite athletes
- It is estimated 2-6% of the general population can develop symptoms
It is common to first develop symptoms in those aged 30-40years and the risk generally increases with age, due to tissue ageing and amassed stress (also known as force) in the tendon over the years.
What are the risk factors for developing achilles tendinopathy?
Many things affect the stress or force being put through the tendon. However, it is not simply the result of exercising too much.
General risks:
- Age: It is most common from the age of 30 onwards
- Gender: It is more common in males
- Weight: If you have a higher than average body mass index (BMI) you are more at risk. You can use the Body Mass Index (BMI) Calculator to assess this.
- Diabetes
- Smoking: Please see our advice on quitting smoking
- Tight and/or weak calf muscles (the muscles in the lower part of your leg)
- Reduced endurance strength in the lower leg muscles
- Reduced strength around you hip and knee muscles
- Stiff joints in your foot
Certain aspects of exercise and training can also increase your risk of developing an achilles tendinopathy.
Common training errors include:
- Running too far when your body is not ready for this distance
- Running at too high an intensity
- Increasing running distances too soon
- Lack of variation in training
- Old or poor quality footwear for leisure or exercise. See this footwear advice video for more information.
- Too much hill running
What are the signs and symptoms of achilles tendinopathy?
The most common symptoms that people describe if they develop an achilles tendinopathy are:
Morning stiffness
Many people complain of stiffness around the foot and tendon when they first put their foot on the ground to walk when they get up in the morning. The stiffness then usually eases after a few minutes of walking, but sometimes this can last longer.
Tenderness over the achilles tendon
The achilles tendon when injured is tender to touch when squeezed. There may be a lump, along with audible clicking from the tendon when you move you ankle. The lump is sometimes mistaken as a swelling.
Variable pain
Some people can ‘exercise’ through the pain. This means that the pain can slightly settle during exercise but after resting it may then increase.
However, some people experience severe pain from their achilles tendon during exercise which stops them from doing sport or leisure activities.
What can I do for my achilles tendon pain?
Treatment options often depend on the severity of your symptoms, with some treatments helping with symptom relief and others addressing the underlying cause and recovery of your tendon.
Changes in lifestyle and modifying the known causes, as previously explained, can reduce the symptoms getting worse. The one professional who can help you manage your symptoms is you!
Addressing the underlying cause
For athletes:
- Modifying sporting activity e.g. run shorter distances
- Take shorter strides when running
- Avoid hill work if getting symptoms
- Change to running on softer surfaces until symptoms settle
- Consider changing worn footwear
For all:
- Consider building strength training and endurance training into weekly routine that addresses your core, hip and lower leg muscles.
- Consider a daily stretching program
- Implement lifestyle changes around reducing weight management, quitting smoking and managing any underlying health conditions such as diabetes or hypertension.
Body weight
If you have a higher than average body mass index (BMI) you are more at risk. You can use the Body Mass Index (BMI) Calculator to assess this.
Find help with weight loss.
Smoking
It is thought smoking could interfere with the blow flow to the tendon. This means that smokers are at an increased risk of an injury to their Achilles tendon.
As a result if the blood flow is poor, then injury to the Achilles tendon may take longer or may not heal well.
If you want help to reduce or quit smoking, please see our information on smoking.
Advice to help with symptom relief
Ice
Can be beneficial in the first 2-3 days following injury or to help manage any flare ups of pain. Some people find that putting a bag of frozen peas wrapped in a towel for 20 minutes every 2 hours whilst you are awake can help with pain.
However, some people do find continual benefit of regularly icing for several weeks following the injury because it allows them to exercise.
Painkillers
A range of different medications may be available to help reduce your pain to allow you to move more comfortably. Do not exceed the daily allowance of these medicines even if your pain is high and always consult a health professional prior to taking any new medication. If you are unsure of what medication you can take, speak with your local pharmacist, practice nurse or GP for guidance.
It is important that if you are prescribed medication that you take them regularly and at the recommended dose (see medication packet for details). All medicines can cause side-effects, particularly if they are not used as prescribed. Side-effects range from common to uncommon and vary from person to person. Information on possible side-effects are available on the leaflet inside the packaging of your medication. It is important to speak to your local pharmacist, practice nurse or GP who may be able to change the dose or the medication itself to something that is more suitable.
You should try and use the prescribed medication regularly at the recommend dose as prescribed. Some medicines can take a number of weeks to have significant effect, however this is dependent on the person. It is best to speak again with your GP or pharmacist about what other options are available if you don’t feel your medicines are helping.
Insoles and braces
There is no reliable evidence to suggest night splints or foot orthoses improve pain or function in patients with mid portion tendinopathy.
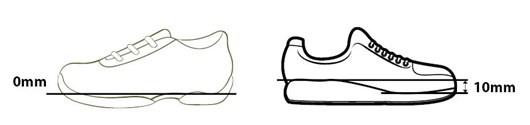
Some studies have found using a small heel raise in both shoes or wearing footwear that has a 10mm heel to toe drop helps with symptom relief (see image below), but this does not address the underlying cause of your Achilles tendon pain.
On rare occasions people with extremely flat feet or high arches may benefit from a biomechanical assessment and the consideration of functional orthoses / insoles to aid in their recovery.
What can I do to aid recovery?
Flare up management
It is common for pain in the achilles tendon to flare-up even though you may have been pacing, building up your activities and exercises gradually. To help tendons recover aim to keep your pain levels below 5 out 10 throughout the day or when doing your exercises. It may be helpful to identify any triggers that may flare up your pain and modify these where possible. However the most important thing is to manage the flare-up while it lasts.
Top tips to help manage flare ups include:
- Reduce your activities and exercises slightly but do not stop them altogether.
- Only rest for short periods of time and introduce regular stretch sessions.
- Break activities down into smaller chunks and pace them throughout the day.
- Wear appropriate footwear (see this video offering advice on appropriate footwear) for most of the day, including in the house.
- Take some over the counter pain medication and consider icing the area as described before.
Pacing
If you are in pain don’t tackle all your activities of daily living, such has housework, at once. Break the harder jobs down into smaller time frames and do something gentler in between. Sometimes a short rest when your Achilles tendon starts to feel painful can be helpful over the course of a day. It is recommended to pace rather than to fully stop all forms of movement or exercise. You may find that taking simple painkillers may help you to keep active.
Walking
There is no need to fully rest until you completely recover. Therefore it is advised when walking to keep your foot in the normal walking position.
Do not walk on your toes, or side of the foot and do not hold your knee or ankle stiff to walk.
Walk around as much as you like but walk normally with a heel to toe walking pattern and initially stay on flat, stable ground. You may need to shorten your stride to achieve this if your tendon is painful or very stiff.
Stairs
When climbing stairs you may need to consider using handrails and go up one leg at time until your muscles become stronger. It is better to go upstairs leading with the non-painful leg one step at a time. If coming down the stairs then lead with the sore leg one step at a time and use the handrail.
Exercises
Exercise is the ‘gold standard’ treatment for this condition.
The exercises can take over 6 months to improve your symptoms but sometimes this can happen more quickly depending on how severe your initial injury was. Approximately, 70% of people are able to return gradually to their leisure activities or sport at around 3 months.
However, there is no overnight cure and continuing with prescribed exercises is vital for your recovery.
Local NHS Ayrshire & Arran physiotherapists and podiatrists have devised exercise videos to help with strengthening the correct muscles, which can be found further down this page.
Footwear
Shoes that have flexible soles generally offer the foot less support and can place strain on tissues such as your plantar fascia and Achilles tendon. Avoid wearing flat unsupportive shoes, instead chose shoes with a good arch support, firm midsole, heel cushioning and a heel gradient.
If you have shoelaces makes sure they are tied appropriately.
See this video offering advice on appropriate footwear for more information.
Do I need a scan?
The diagnosis of an achilles tendinopathy is usually from history alone and does not need an further investigation.
If imaging is necessary it is likely that an ultrasound scan will be used to assess the tendon. The ultrasound scan uses soundwaves to create an image of your tendon on a screen. This is quick, safe and an effective way to see your tendon in a static and moving positions. This type of scan is useful on the rare occasion when your achilles tendon pain is not responding to the treatment plan prescribed. It can be performed by your podiatrist or physiotherapist to help aid in treatment planning and adapting exercise plans or in rare circumstances for surgical planning.
Magnetic Resonance Imaging (MRI) may also be used, but is rare for this injury unless you have been unresponsive to the full conservative advice and treatments that a physiotherapist or podiatrist has issued.
Could I rupture the tendon?
Achilles tendon tears and ruptures, although less common, can occur during strenuous physical activity such as sprinting, running upstairs, running for the bus, or even spontaneously (although this is usually in the elderly). Usually a rupture will occur just above your heel bone as it is this region that has the poorest blood supply and is therefore the most susceptible to injury but can happen anywhere along the tendon. Individuals who have suffered a rupture will often describe a ‘ripping or “popping’ sound followed by pain and loss of power or ability to rise to tip toe.
Achilles tendinopathy exercises
The exercises in the videos below have been provided to help with your tendon pain. If there is any doubt about your fitness to do these exercises then please discuss this with your GP.
You may find that these exercises may slightly increase your symptoms initially. However you should find that the exercises themselves will become easier to do and that you begin to move your knee more easily. It can take around 12 weeks for you to notice a great improvement.
If the exercises do cause some discomfort, then taking prescribed medication from your GP or pharmacist may help you to continue to exercise.
If these exercises cause a large increase in your pain, or after 12 weeks there are no noticeable changes in your day to day symptoms, please contact your GP or NHS Inform for more advice.
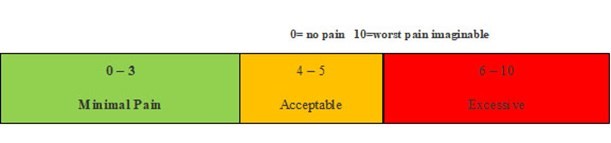
The guide below will help ensure you are working at the right level.
Pain during exercise
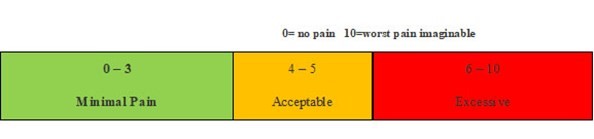
Within the scale, aim to stay in the green or amber boxes. If you are in the red area then you can modify the exercises by:
- reducing the amount of movement during an exercise
- reducing the number of repetitions
- reducing the weights
- reducing your speed
- increasing rest time between sets
Pain after exercise
Your pain or other symptoms should return to your pre-exercise baseline within 30 minutes of exercising. On the morning after your exercises, you should not feel an increase in pain or stiffness that lasts longer than 60 minutes.
Disclaimer
Please note: These exercises should not be used without prior consultation with a medical professional as the use of the wrong exercise may cause additional health related issues and discomfort. NHS Ayrshire & Arran and MSK NHS Ayrshire & Arran are not liable or responsible for any harm, losses or damages whatsoever resulting from the use or misuse of the information contained in or implied by the provided information in each video. These are provided for information only.
If you have any concerns about your ability to perform exercise then please discuss your concerns with your doctor or healthcare provider prior to participating in any advice that is on the MSK NHS Ayrshire & Arran website.
Please choose the most relevant exercise section for you.
Section 1 – Mobility Exercises
Exercise 1 – Circumduction
Ankle rotations are important to help maintain and improve your range of movement after an injury. You can do this exercise in either sitting or lying.
To do this exercise – start by slowly turning your ankle to the left and draw circles with your foot as pain allows. Repeat this for 20-30 repetitions. Then slowly turn your ankle to the right and draw circles with your foot as pain allows. Repeat for 20-30 repetitions.
Do this exercise every 2 hours as pain allows.
Exercise 2 – Active Plantarflexion/Dorsiflexion
Ankle movements in a forward and backward direction is an important exercise to help maintain and improve your range of movement after your injury. You can do this exercise in either sitting or lying.
To do this exercise – start by slowly pointing your toes away from you as pain allows. Then slowly pull your toes back up towards you as pain allows. Repeat this 20-30 repetitions.
Do this exercise every 2 hours as pain allows.
Section 2 – Stretching Exercises
Exercise 1 – Towel Stretch (Gastrocnemius)
Stretching the muscles is important to maintain range of movement as you recover from your injury. It is advised to start this early following your injury in a non-weight bearing position.
To do this exercise – sit on the floor or on top of your bed. Place the leg with the injured ankle in front of you and keep the leg straight. Wrap a towel around the ball of your foot, that is just below your toes. Pull back on the towel slightly until you start feeling a stretch at the very bottom of your feet and the back of your lower leg. Aim to hold the stretch for 30 seconds.
Repeat this 3 times, 4 times per day.
Exercise 2 – Towel Stretch (Soleus)
Stretching the muscles is important to maintain range of movement as you recover from your injury. It is advised to start this early following your injury in a non-weight bearing position. This exercise will create a deeper stretch down the back of your lower leg.
To do this exercise – sit on the floor or on top of your bed. Bend the leg with the injured ankle in front of you with the heel resting on the surface you are performing the exercise on. Wrap a towel around the ball of your foot, this is just below the toes. Pull back on the towel slightly until you start feeling a stretch deep in the back of the lower leg. Aim to hold the stretch for 30 seconds.
Repeat this 3 times, 4 times per day.
Exercise 3 – Standing Calf Stretch
Once your pain becomes more controlled and you can put more weight into the ankle it is recommended to progress your stretching into a standing position.
To do this exercise:
- Place your hands on a wall for support and take a step back with the affected foot. It is important that the heel of the affected foot remains on the ground throughout this stretch. Keep the toes of both feet pointing towards the wall. Now begin to bend the knee of your front leg whilst moving your chest towards the wall. You should feel a stretch in the back of your lower leg, hold for 30 seconds. Repeat 3 times, 4 times per day.
- The second part of this exercise is aimed at stretching the soleus muscle. Adopt the same starting position as you did for the previous exercise. Slide the affected foot towards the front foot as demonstrated. This time when bending the front knee also bend the knee of the back leg until you feel a stretch deeper in the calf muscle. Hold this for 30 seconds. Repeat 3 times. 4 times per day.
Section 3 – Isometric Strengthening Exercises
Exercise 1 – Seated Isometric (Double Leg)
To do this exercise – bring yourself to the edge of a chair. Have both feet flat on the floor. Slowly raise both heels up from the floor so that the weight is going through both balls of your feet. You should feel a pulling sensation in the lower muscles of your legs. Hold this position for 10 seconds and then slowly lower the heels back down onto the floor. Do this 5 times and repeat 4 times per day.
Then during the second week increase to 20 seconds, 5 times, 4 times per day for a week.
Then the third week increase to 30 seconds, 5 times, 4 times per day for a week.
Then the fourth week increase to 40 seconds, 5 times, 4 times per day for a week.
Exercise 2 – Seated Isometric (Single Leg)
To do this exercise – bring yourself to the edge of a chair. Have both feet flat on the floor. Slowly raise the heel up from the floor of your painful ankle so that the weight is going through the ball of that foot. The other foot remains flat on the floor. Hold this position for 10 seconds and then slowly lower the heels back down onto the floor. Do this 5 times and repeat 4 times per day.
Then during the second week increase to 20 seconds, 5 times, 4 times per day for a week.
Then the third week increase to 30 seconds, 5 times, 4 times per day for a week.
Then the fourth week increase to 40 seconds, 5 times, 4 times per day for a week.
Exercise 3 – Isometric Stance Over Step (Foot Neutral Position)
To do this exercise – stand on a step with both feet well supported. Hold onto any hand railing to assist with your balance. Slowly slide the heels off the edge of the step. Do not allow the heels to drop lower than the step level.
Hold this position for 10 seconds and then slowly lower the heels back down onto the floor. Do this 5 times and repeat 4 times per day.
Then during the second week increase to 20 seconds, 5 times, 4 times per day for a week.
Then the third week increase to 30 seconds, 5 times, 4 times per day for a week.
Then the fourth week increase to 40 seconds, 5 times, 4 times per day for a week.
Exercise 4 – Isometric Plantarflexion in Standing (Double Leg) - Legs Straight
To do this exercise – rise to a standing position. Hold onto any wall, chair to kitchen top surface to assist with your balance. Slowly raise both heels off the floor so that the weight is going through the balls of both feet. Keep the legs as straight as possible. Hold this position for 10 seconds and then slowly lower the heels back down onto the floor. Do this 5 times and repeat 4 times per day.
Then during the second week increase to 20 seconds, 5 times, 4 times per day for a week.
Then the third week increase to 30 seconds, 5 times, 4 times per day for a week.
Then the fourth week increase to 40 seconds, 5 times, 4 times per day for a week.
Exercise 5 – Isometric Plantarflexion in Standing (Double Leg) – Knees Bent
To do this exercise – rise to a standing position. Hold onto any wall, chair to kitchen top surface to assist with your balance. Bend both knees slightly. Slowly raise both heels off the floor so that the weight is going through the balls of both feet. Hold this position for 10 seconds and then slowly lower the heels back down onto the floor. Do this 5 times and repeat 4 times per day.
Then during the second week increase to 20 seconds, 5 times, 4 times per day for a week.
Then the third week increase to 30 seconds, 5 times, 4 times per day for a week.
Then the fourth week increase to 40 seconds, 5 times, 4 times per day for a week.
Exercise 6 – Isometric Single Stance Over Step (Foot Neutral Position)
To do this exercise – stand on a step with both feet well supported. Hold onto any hand railing to assist with your balance. Slowly slide the heels off the edge of the step. Do not allow the heels to drop lower than the step level. Lift the leg of the non-painful leg up to a 90 degree hip flexion. The painful ankle should remain over the edge of the step.
Hold this position for 10 seconds and then slowly lower the heels back down onto the floor. Do this 5 times and repeat 4 times per day.
Then during the second week increase to 20 seconds, 5 times, 4 times per day for a week.
Then the third week increase to 30 seconds, 5 times, 4 times per day for a week.
Then the fourth week increase to 40 seconds, 5 times, 4 times per day for a week.
Exercise 7 – Isometric Single Leg Plantarflexion in Standing (Leg Straight)
To do this exercise – rise to a standing position. Hold onto any wall, chair to kitchen top surface to assist with your balance. Slowly raise the heel of the painful ankle off the floor so that the weight is going through the ball of that foot. Keep the leg as straight as possible.
Hold this position for 10 seconds and then slowly lower the heels back down onto the floor. Do this 5 times and repeat 4 times per day.
Then during the second week increase to 20 seconds, 5 times, 4 times per day for a week.
Then the third week increase to 30 seconds, 5 times, 4 times per day for a week.
Then the fourth week increase to 40 seconds, 5 times, 4 times per day for a week.
Exercise 8 – Isometric Single Leg Plantarflexion (Knee Bent)
To do this exercise - rise to a standing position. Hold onto any wall, chair to kitchen top surface to assist with your balance. Slightly bend the knee of the leg of the painful. Slowly raise the heel of the painful ankle off the floor so that the weight is going through the ball of that foot.
Hold this position for 10 seconds and then slowly lower the heels back down onto the floor. Do this 5 times and repeat 4 times per day.
Then during the second week increase to 20 seconds, 5 times, 4 times per day for a week.
Then the third week increase to 30 seconds, 5 times, 4 times per day for a week.
Then the fourth week increase to 40 seconds, 5 times, 4 times per day for a week.
Section 4 – Strengthening Exercises
Exercise 1 – Seated Heel Raises
To do this exercise – bring yourself to the edge of the chair. Both feet should be flat on the floor. Slowly raise both heels up from the floor so that the weight is going through both balls of your feet. You should feel a pulling sensation in the lower muscles of your legs. Hold for 5 seconds and then slowly bring your heels back onto the floor.
Aim for 3 sets of 15 repetitions.
Exercise 2 – Heel Raises (Gastrocnemius)
To do this exercise – rise into a standing position. Hold onto any wall, chair to kitchen top surface to assist with your balance. Keep your legs straight. Slowly raise both heels up from the floor so that the weight is going through both balls of your feet. You should feel a pulling sensation in the lower muscles of your legs. Hold for 5 seconds and then slowly bring your heels back onto the floor.
Aim for 3 sets of 15 repetitions.
Exercise 3 – Heel Raises (Soleus)
To do this exercise – rise into a standing position. Hold onto any wall, chair to kitchen top surface to assist with your balance. Slightly bend both knees. Slowly raise both heels up from the floor so that the weight is going through both balls of your feet. You should feel a pulling sensation in the lower muscles of your legs. Hold for 5 seconds and then slowly bring your heels back onto the floor.
Aim for 3 sets of 15 repetitions.
Exercise 4 – Single Leg Heel Raise (Gastrocnemius)
To do this exercise – rise into a standing position. Hold onto any wall, chair to kitchen top surface to assist with your balance. Keep both legs straight. Stand on your injured ankle and lift the non-painful side up to a 90 degree hip bend.
Slowly raise the heel on the painful side from the floor so that the weight is going through the ball of the foot. Hold for 5 seconds and then slowly bring your heel back onto the floor.
Aim for 3 sets of 15 repetitions.
Exercise 5 – Single Leg Heel Raise (Soleus)
To do this exercise – rise into a standing position. Hold onto any wall, chair to kitchen top surface to assist with your balance. Bend both knees slightly. Stand on your injured ankle and lift the non-painful side up to a 90 degree hip bend.
Slowly raise the heel on the painful side from the floor so that the weight is going through the ball of the foot. Hold for 5 seconds and then slowly bring your heel back onto the floor.
Aim for 3 sets of 15 repetitions.
Section 5 – Eccentric Loading
Exercise 1 – Eccentric Loading (Leg Straight)
To do this exercise – stand on the edge of a step with both heels over the edge. Keep legs straight. Raise both heels and put all weight into the balls of both feet. Lift the non-painful leg off the step to 90 degree hip bend. The full weight will now be on your painful ankle. Then slowly lower the heel down so that the heel goes beyond the step level. Then repeat the cycle.
Aim for 3 sets of 15 repetitions.
Exercise 2 - Eccentric Loading (Knee Bent)
To do this exercise – stand on the edge of a step with both heels over the edge. Slightly bend both knees. Raise both heels and put all weight into the balls of both feet. Lift the non-painful leg off the step to a 90 degree hip bend. The full weight will now be on your painful ankle. Then slowly lower the heel down so that the heel goes beyond the step level. Then repeat the cycle.
Aim for 3 sets of 15 repetitions.
Section 6 – Functional Exercises
Exercise 1 - Tandem Static Stance
To do this exercise – stand with your heel in front of your other foots toes. Hold this position for 60 seconds. You may need to hold onto any wall, chair to kitchen top surface to assist with your balance. Once 60 seconds then switch feet position and repeat for a further 60 seconds.
Exercise 2 – Squat
To do this exercise – in standing have you feet shoulder-width apart. Slowly lower you bottom towards the floor making sure the knees do not move inwards. Lower has far as comfortable. Then slowly return back to the starting position.
Aim to do 3 sets of 15 repetitions.
Exercise 3 – Forward Lunge
To do this exercise – in standing have you feet shoulder width apart. Step forwards with your painful ankle. Place the foot and heel firmly onto the ground. Slowly bend the front knee and back knee and lower as far as possible. The return to the starting position.
Aim to do 3 sets of 15 repetitions.